
Website Migration Guides
A simple free resource for website migration
A simple free resource for website migration

Quick Guide Steps
Below are the basic steps to move zencart to a new host. Full detailed steps are listed further down the page.
Zencart is an ecommerce system that is close to my heart. It was one of the first ecommerce systems I ever used and whist it may not be as popular as other ecommerce systems on the market, it's still in use by thousands of users and has an active forum.
Moving a ZenCart website from one server/host to another does look complicated but the good news is it actually quite easy to do (especially if you have the right migration guide to follow).
The below step by step guide will talk you through how to move your ZenCart 1.5 website to a new hosting company.
Please note, this guide follows the official guidelines on migration as recommended by ZenCart. As such, it is different to other guides online (which incorrectly skip the fresh install steps in favour of updating the configure.php files manually).
Before you do anything, check what version of ZenCart you are currently running. This can be found in the top right hand corner of your ZenCart admin area.

Make a note of this (e.g. in the above image it's version '1.5.6a') as you will need it later.
It is important to note that when moving hosting companies you should never try and upgrade your ZenCart site. An upgrade should be done either before or after the migration is complete but never during the migration.
The key to any sucsessful migration being headache free is to make sure you have a full website backup. If anything should go wrong, the backup will allow you to restore your website.
Whilst many hosting companies offer a 1 click backup feature (which is great), the below guide will show you how to take an 'old school' backup of your ZenCart website using FTP and PhpMyAdmin (don't worry if you haven't heard of these terms before). The reason we have done this is that all hosts provide FTP and PhpMyAdmin access and as such anyone should be able to follow this guide.
The first step is to download a FTP program. A FTP program is an application/software that allows you to connect to your website hosting and view the ZenCart files/folders. You can use any FTP client you like but in this guide we will be using FileZilla FTP. The reason for this is it's a popular FTP program and it's free to download.
You can download FileZilla for free from https://filezilla-project.org
Once you have downloaded and installed FileZilla, you will need to collect your FTP login details from your current host. Usually these can be found in a welcome e-mail or in your hosting control panel. You will need:
1. FTP host
2. FTP username
3. FTP password
4. FTP port (usually 21).
If you are unable to locate the above login details, copy the below and send it to your host.
Now that you have your FTP login details, you will need to create a new folder on your computer (so you have somewhere to download the backup to). Create a new folder on your computer and call it "ZenCart Backup".
Open up FileZilla and enter your FTP connection details across the top, then click the "Quickconnect" button.

You should see some connection text appear in the top box then after a few seconds you should see a list of folders appear in the right pane. In this list of folders, you will find your website public folder. This is where your ZenCart website / folders are and it is usually called "public_html" or "htdocs". Double click your public folder to open it.

You should now see a list of your ZenCart files / folders. These folders include (but are not limited to) "cache", "includes", "media" and "pub". You will also have one folder with a random name that will not match our example below (this is your admin folder). In the example below this is the adUlt-jjS-briSk folder.

In the left pane of FileZilla, open the "Zencart Backup" folder you made earlier (if you did not make one, you can make one now by right clicking on the left pane and clicking "Create Directory") and then open it by double clicking on it.

You should now have a blank pane on the left hand side and your ZenCart website's files/folders in the right hand pane.

Select all the Zencart files/folders in the right hand pane to turn them blue in colour (on a windows computer, click any folder in the right pane once, then press 'CTRL' and 'A' to select all the files/folders) then right click and select 'Download'.

You should now see lots of activity at the bottom of FileZilla as it downloads your files/folders.

That's it, you have now backed up your ZenCart's files and folders into your "ZenCart backup" folder.
Now that you have a backup of your ZenCart's files, you need to backup the database.
The first step is to check what your database is called, to do this, open the "ZenCart backup" folder you made earlier and look for the 'includes' folder. Open this folder up and you should see a file called "configure.php"
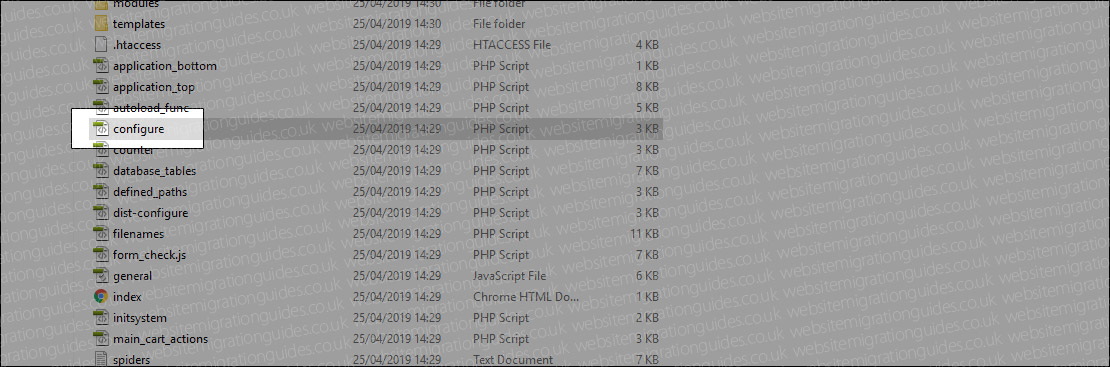
Open this file up in a plain text editor such as notepad and look for the line
define('DB_DATABASE', 'XXXXXXX');
(Yours will have something other than 'XXXXXXX')
What you have written instead of XXXXXXX is the name of your database.
Now that you know the name of your database, you can move on to backing it up. Backing up a database is very easy to do and can be done using PhpMyAdmin. PhpMyAdmin is a free software tool provided by virtually all hosting companies and can usually be accessed via your hosts control panel (look for a link called My SQL Databases or PhpMyAdmin).
If you are unable to locate PhpMyAdmin, copy and paste the below into a message to your host.
Once you have found the link to PhpMyAdmin, open it up and select your database from the menu on the left (this will be the same name as the XXXXXXX above).

On the right hand side, you should now see your ZenCart tables. These will include (but are not limited to) "address_book", "configuration", "db_cache" and "zones".

Across the top, you should see an 'Export' tab, click this to load up the export page.

Next, click the Custom radio button.

From the 'Compression' dropdown select "zipped".

Finally, scroll down to the bottom of the page and click the 'Go' button. This will then download a copy of your database to your computer.

Now that you have a backup of your website, you need to stop any new orders from being placed. This is because when you move on to restoring your backup later (on your new host), any new orders would not be copied across.
To stop any orders being placed, you can put ZenCart into maintenance mode. To do this, log into your ZenCart admin area and move over 'Configuration' and click 'Website Maintenance' from the dropdown.

Make sure the "Down for Maintenance: ON/OFF" is selected and click the "Edit" button on the right.

Click the "true" radio button then click "Update".

Your website will now show a "The site is currently down for maintenance. Please excuse the dust, and try back later." message and stop any customers from placing a new order.
Open up your ZenCart Backup folder then open up the includes folder and finally open up the configure.php file (again using notepad or a plain text editor).
Locate the line:
define('DB_PREFIX', 'AAAAAA');
(Yours will have something other than 'AAAAAA')
Whatever is written (if anything) where AAAAAA is, is your database prefix. Make a note of this (remembering it is case sensetive) as you will need it later.
At this point you may be asking why would I perform a fresh install of Zencart instead of just restoring my backup? Whilst you could do this, a clean install will make sure that all your configuration files are set up 100% correctly (avoiding a lot of the hassle that comes with incorrect paths and database details).
In step one above, you made a note of your ZenCart version. In order to make sure no issues occur during the next stages, you will need to download the exact same version of ZenCart from https://sourceforge.net/projects/zencart/files/. Do not use any other version as it will result in errors occuring at a later date.
The next step is to unzip the ZIP you downloaded in 5.1 above. On a Windows computer, right click on the zip and select "Extract All..."

In the popup window, make note of the destination then click extract (in this example we will extract it to the desktop to keep things simple).

You should now have a new folder usually called zen-cart-vXXXXXXX (where XXXXX is the version). Open up this folder and check it extracted correctly (you should see a list of Zencart files / folders including (but not limited to) "admin", "cache", "downloads" and " zc_install").

The next stage is to upload the files/folders you unzipped in step 5.2 to your new host's public folder. In order to do this, you will need to use a FTP client and in turn will need your new host's FTP login details. As with your old host, you will need the FTP Host, username, password and port number. If you do not know these, ask your host the below question.
Open up FileZilla again and enter your new host's FTP login details at the top then click "Quickconnect".

Once connected, locate your host's public folder (usually called public_html or htdocs or www) in the right hand pane and open it.

In the left pane, locate the folder where you unzipped the new ZenCart that you downloaded in step 5.2 e.g zen-cart-vXXXXXXX (where XXXXX is the version) and open it.

You should now have in the left pane your freshly downloaded version of ZenCart and in the right pane your new hosts public folder.

Select all the files/folders in the left pane (so they are highlighted in blue) then right click on any file and choose "Upload".

You should now see the new ZenCart files being uploaded to your new hosting.

Once complete, close FileZilla for now.
At this point, you need to be able to access your new hosting via your website domain e.g. www.yourshop.com. However, it will currently be pointing to your old hosting and in turn loading your old "down for maintenance" ZenCart site.
This means you have three options:
Once you have completed one of the above, you can move onto 5.4 below.
Before you can start the new ZenCart install, you will need to set up a new database with your new host and find out how to access it via PhpMyAdmin. These steps can vary drastically depending on the host (some of which we have covered in the "ADDITIONAL NON CMS RELATED GUIDES" on our homepage). Contact your new host and ask them the below
If you create the database yourself, make sure to write down the MySQL database name, the MySQL username, the MySQL password and the MySQL host (usually localhost) as you will need these later.
Open up your website in a browser (e.g. Google Chrome, Microsoft Edge) and you should see the ZenCart 1.5 install screen.
Click the "CLICK HERE" link in option one under "This is your first time using Zen Cart".

Assuming you do not have any error messages, click continue. If you do, contact your host and let them know what they are (they should then be able to help you fix them).

Tick the "Agree to license terms:" box and check the website addresses are correct in all of the boxes (this will usually be autofilled correctly for you). Then click "Continue".

The next stage is the database setup. It is important to get this step 100% correct or when you restore your shop's database later on, it will not work. Using the database details from the new database that you set up in step 5.4, complete the following;

A progress bar will appear if the database settings are correct (if not, recheck over your settings with the ones provided by your new host).

Fill in the requested details and make note of the "Admin Directory" as you will need this later. Then click "Continue".

If your new hosting is running Nginx, click the link and follow the steps to secure your ZenCart site (if you do not know if you are using Nginx, contact your new host for clarification).

You will now need to delete the 'zc_install' folder from your new host via FTP. To do this, open up FileZilla and connect to your new host (as you did earlier). Open up your public folder again (e.g. public_html) and locate the 'zc_install' folder. Right click on the folder and select 'Delete'.

Once the folder has been deleted, move onto step 6 below.
Now that you have a fully working new install of ZenCart on your new host, you will need to update/remove some files/folders in your backup (from step 1).
First you need to remove two files from your backup called configure.php. Whilst they share the same name, they are NOT the same file.
Open your "zencart backup" folder and open the includes folder. Inside this folder, you will see the first configure.php file. Remove this file from the folder (e.g. either delete it or move it somewhere outside your "zencart backup" folder (recommended).
The next configure.php file is inside your admin/includes folder (your admin folder will be a random series of words/letters). Open up your admin folder and then open the includes folder. As before, move the configure.php file outside of your "Zencart backup" folder.
Next, you need to rename your admin folder. Near the end of step 5.5 you made a note of your new admin folder name, rename the admin in your backup to match this exactly (it's case sensitive).

You're now ready to start restoring your website. To do this, you will be uploading your backup over the top of the 'new' zencart site.
Open up FileZilla again and connect to your new host then open the public folder (as before). You should see your new ZenCart website files/folders.
In the left pane open up the ZenCart backup you took in step 1 (and that you edited in step 6).

Select all of the ZenCart backup files/folders in the left pane then right click on any of them and select upload.

Your files will start uploading and shortly after you will get a "Target file already exists" message. This is simply saying that a file on your server with the same name already exists (which is correct as your new version of ZenCart is currently online).
Tick the "Overwrite" radio button then tick the "Always use this action" and "Apply to current queue only" boxes. Then click the "OK" button.

You will now see your ZenCart file backup being uploaded at the bottom.

Once complete, check the failed transfers for any files that have not uploaded correctly and re-upload these if any are found.
Now that you have uploaded the backup of your ZenCart files and folders, the last restore step is to drop the data from the new database (that you set up in step 5.5) and import the data from your database backup.
On your new host, open up PhpMyAdmin and select your ZenCart database from the left menu (if you are not sure what the database is called, it is what you entered in the "Database Name" box in step 5.5).

You should now see a list of ZenCart tables. Scroll down to the bottom and click the "Check all / Check tables having overhead" box. Then from the dropdown click "drop".

You should now see a warning message regarding dropping the ZenCart tables.
WARNING : Make sure you are in your NEW ZenCart database on your NEW host (not your OLD host) as this will delete all the data in the database.Click the "Yes" button to continue.

You should now see the message "No tables found in database.".
Click the Import tab at the top of the page.

Click the "Choose file" button and select the database backup (SQL) that you took in step 2.2, then click "Open".

Click the "Go" button at the bottom to start the import.
 .
.
You should see an "Import has been successfully finished" message appear at the top once the import is completed.
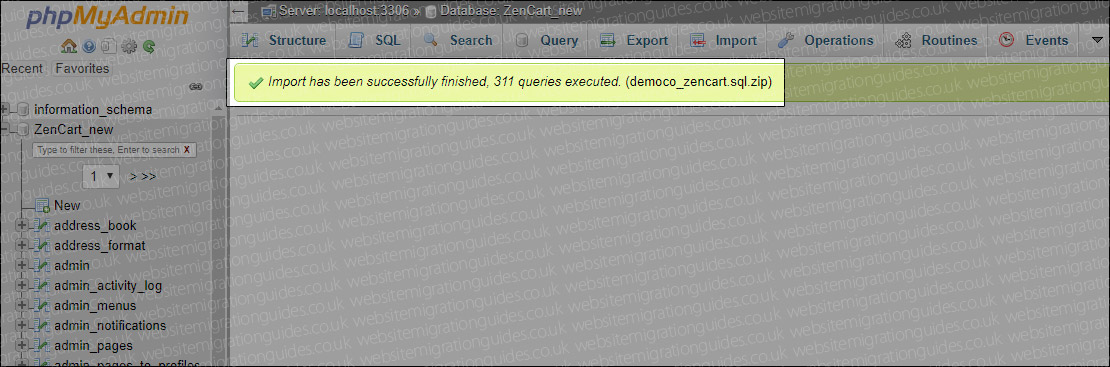
If you are running ZenCart version 1.5.2 or newer, that's it. Your website should now load and you've moved to the new server! If you are running an earlier version of ZenCart then you will need to follow the additional steps below.
If you are running ZenCart version 1.5.1 or older, you will need to reset your "SESSION_WRITE_DIRECTORY" key in the database (if not, you can skip to step 10). The good news is ZenCart have a plugin to do this for you. Head over to https://www.zen-cart.com/downloads.php?do=file&id=8 and download the "Fix Cache Key.zip" file.

Extract the "Fix Cache Key.zip" file on your computer.

You should now see a folder with "fix_cache_key.php" inside it. Open up FileZilla and connect to your new host again. Once connected, open up the public_html folder in the right pane and open the folder where fix_cache_key.php is located in the left pane. Right click on fix_cache_key.php and select upload.

Keep FileZilla open as you will need it again shortly.
Once "fix_cache_key.php" has uploaded, open up your browser and enter the address of the file to open it. e.g. if your website is at www.yourwebsite.co.uk, the file would be at www.yourwebsite.co.uk/fix_cache_key.php
At this stage one of two things will happen.
1. If the keys match, you will see the message "No changes required".
2. If the keys do not match, you will see "Now synchronizing..." and it will synchronise the keys.

Go back to FileZilla and in the right pane, right click on "fix_cache_key.php" and click "Delete"

So by this stage, you should have a fully functional copy of your website on your new host. At this stage we would suggest :
If this guide has helped you or if you feel it could be improved, please let us know in the comments below.
 |
Which hosting company do you use? I'm Philip and this little website is my online side project. I often get asked which company I use for my website projects. Most of the hosting companies out there are no longer independent but instead owned by one of the big hosting giants who generally offer poor or average services (in my opinion). Krystal.uk (the company I use) are still independent (UK based) and go against everything the big companies stand for. Fast servers, good tech support and they actually re-invest a huge chunk of their profits to keep improving their services. All Krystal customers can offer people a £20 referral discount. If you do move to Krystal, please consider using the discount code "WMG" to get £15 off your hosting order (Krystal will give me the remaining £5 for referring you). Thanks again and happy surfing. |