
Website Migration Guides
A simple free resource for website migration
A simple free resource for website migration

Quick Guide Steps
Below are the basic steps, full detailed steps are listed further down the page.
This guide will explain how you can move your joomla 3.X site to a new server. Each step has been re-created in detail so everyone should be able to follow this guide to move hosts no matter the technical experience.
The first thing you will want to do is backup your current site. Most hosts will have a feature to backup your site with a few clicks. However, just incase they don't, you can follow the below.
To do this you will need a FTP client. Don't worry if you have not heard of FTP before (it's pretty easy to use). There are several FTP clients available but in this guide we will be using filezilla.
You can download FileZilla from https://filezilla-project.org
Once downloaded, ask your current host for the following.
1. Your FTP host
2.
Your FTP username
3.
Your FTP password
4. Your FTP port
5. Please note, some hosts require FTP to be unlocked. If so, ask them how to do this (usually this can be done via your host's control panel).
It is likely you have these details in a welcome e-mail but if not, your host will be able to help.
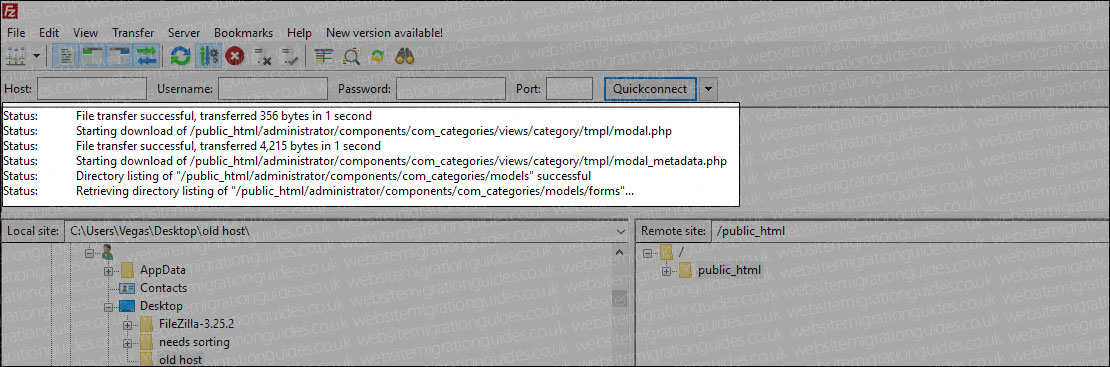
Open up fileZilla and enter your FTP details in the boxes at the top then click the "Quickconnect" button.

Once connected, you should see your hosting files/folders on the right.
All hosting has a public folder (usually called public_html or htdocs). This is where all the files/folders of your joomla website will be located. Sometimes (depending on how your host is set up), it will automatically log you into the public folder. If you see a public_html or htdocs folder, double click to open this up.

What you need to do now is locate your joomla install. If your joomla website loads when you type in your domain e.g. www.example.com then it is likely your joomla install is in the public folder directly. If you have to add a folder to your website address e.g. www.example.com/a-folder, it is likely joomla is installed in a folder called "a-folder".
What you need to find is the joomla files/folders. If you can see a file called "configuration.php" you are in the right location. You should also see other folders/files such as "administrator", "plugins" and "templates".

Once you have located your joomla install, you need to copy all the files and folders to your computer.
To do this, first create a folder on your computer where you want to backup your website files to. To keep things easy to follow in this guide, we call the folder "old host" and create it on the desktop. Using the window on the left of FileZilla, locate and open your "old host" folder.

Next, select all the files/folders on the right side so you have all your joomla files/folders highlighted in blue.

Right click on any of the blue highlighted folders / files and click 'download'.

You should now see all your joomla files/folders start downloading to the "old hosts" folder.
Once complete, the transfer messages at the top will stop and you should hear a completion noise. This may take a while to complete depending on the size of your joomla site.
That's it, you have now backed up all your joomla files/folders ready to move to your new host.
To backup your database, you will need to gain access to phpmyadmin. PhpmyAdmin is a database management control panel where you can export copies of your database to inport them onto your new host.
PhpMyadmin can usually be found in your hosting control panel (look for databases). If you are unable to find it, ask your host for help (we have yet to see a host that does not offer phpmyadmin access).
Once you have opened phpmyadmin, you may need to click your database from the left. The name of this database will vary and if you are unsure, you can check the configuration.php file you downloaded in the previous step (look for the line "public $db = 'NAME';" where NAME will be your database name).

You should now see a list of Joomla! database tables such as "_assets", "_associations" and "_banners". Don't worry if yours does not match the picture as you may also see a prefix in front of your tables e.g. XYZ_assets.
Click the 'Export' tab at the top.

Click the 'Go' button to download a copy of your database.

When prompted, save the file to your desktop (you can save it into your "old hosts" folder).
That's it, you have now backed up your website and database
You should now have a backup of your joomla files/folders and databases. As such, you can move onto restoring these on the new host. The process is pretty much the same as the above but in reverse with a few small extra steps. Firstly, you will need to restore your database. To do this you will need to ask your host how to create a new database. Usually this can be done by yourself in the hosting control panel. Once created, make a note of the below and ask your host how to open it in PhpMyAdmin:
1. The host (usually an IP address e.g. '11.222.333.444' or 'localhost').
2. The database username.
3. The database name.
4. The database password.
Open phpmyadmin on your new host and open your database. Again, you may need to click on your database in PhpMyAdmin to open it.

Next, click the 'Import' tab at the top.

Click the 'Choose File' button and select the Joomla database that you made a backup of earlier in this guide.

Then click the 'Go' button at the bottom.

Once complete, you should see a green 'Import has been successfully finished' message.

That's it, you have now restored your database.
Before uploading your joomla files, you will need to update your configuration.php file to reflect the new database details.
To do this, you will need to use a basic text editor. We suggest notepad++ which is free and can be downloaded from https://notepad-plus-plus.org.
In the backup from your old host, locate the file 'configuration.php' and open it.
Locate the line:
public $host = 'XXXXXX';
(yours will have something other than XXXXXX) and update the XXXXXX to match your database host).
Locate the line:
public $user = 'YYYYYY';
(yours will have something other than YYYYYY) and update the YYYYYY to match your database username.
Locate the line:
public $password = 'ZZZZZZ';
(yours will have something other than ZZZZZZ) and update the ZZZZZZ to match your database password.
Locate the line:
public $db = 'AAAAAA';
(yours will have something other than AAAAAA) and update the AAAAAA to match your database name.
Locate the line:
public $log_path = '/PATH-TO-PUBLIC-FOLDER/administrator/logs';
(yours will have something other than PATH-TO-PUBLIC-FOLDER) and update the PATH-TO-PUBLIC-FOLDER to match the full path to your hosting's public folder (your host should be able to provide you with your hosting's full path.
Locate the line:
public $tmp_path = '/PATH-TO-PUBLIC-FOLDER/tmp';
(yours will have something other than PATH-TO-PUBLIC-FOLDER) and update the PATH-TO-PUBLIC-FOLDER to match the full path to your hosting's public folder (your host should be able to provide you with your hosting's full path.
Finally save the file and close it.
Again, we will be using FileZilla but any FTP client will do. Contact your new host and ask them for the FTP login details, then enter these into FileZilla at the top and click 'connect'.

Once connected, locate your public folder (usually called public_html or htdocs) and open it.

In the left navigation pane, open up your 'old host' folder (or the folder where the backup is located).

Select all the files (excluding your database if you've saved this in the same location), then right click and select 'upload'.

As with the backup, you should see multiple messages appear at the top informing you of the files being uploaded.

Once your joomla backup has been uploaded, close FileZilla.
You have now completed all the steps required to set up your Joomla site on your new hosting. All that would be left is to update your domain to point to your new hosting.
If this guide has helped you or if you feel it could be improved, please let us know in the comments below.
 |
Which hosting company do you use? I'm Philip and this little website is my online side project. I often get asked which company I use for my website projects. Most of the hosting companies out there are no longer independent but instead owned by one of the big hosting giants who generally offer poor or average services (in my opinion). Krystal.uk (the company I use) are still independent (UK based) and go against everything the big companies stand for. Fast servers, good tech support and they actually re-invest a huge chunk of their profits to keep improving their services. All Krystal customers can offer people a £20 referral discount. If you do move to Krystal, please consider using the discount code "WMG" to get £15 off your hosting order (Krystal will give me the remaining £5 for referring you). Thanks again and happy surfing. |